User Guide
Built to assist Cardlytics service representatives in resolving customer inquiries
Adding Users
If you need to add additional users to the CSA Tool, reach out to your Integration Consultant or Support Team and provide them with the following information:
- User’s First and Last Name
- User’s Email
- Users will need to be able to receive email verification - If you have users that are not able to send/receive external email, be sure to advise the Support Team so that alternative methods can be arranged.
- User’s Role
- Tier 1 - Users are not able to Escalate tickets to Cardlytics.
- Tier 2 - Users are able to Escalate tickets to Cardlytics.
Accessing The Tool
Your bank has chosen which sign on method you can use. You can access the CSA tool either:
- Via email and password, OR
- Via single sign on (SSO)
Cardlytics will provide you with the URL. You can reach out to your Cardlytics account team with any questions or if you run into issues accessing CSA.
Where to Start?
There are several ways to access the data to assess your customer’s claim.
For example:
- If your customer says they activated an offer, but they didn’t get a reward for their transaction - you can start with the Offer tab, then find the “Transactions” tab and see if there are any redemptions associated with the offer / transaction(s).
- If your customer says they received a reward, but it was less than they expected - you can start with the Redemption tab.
- If the customer has previously raised an issue, you can also look for tickets associated with the customer, and start there.
This document walks you through how to look up each part of the information available, and you’ll be able to then approach each individual customer issue in the most efficient way.
Looking Up Customers
Once you’ve successfully logged into the tool, your first step will be to look up the customer you’re researching in the top left search box labeled Customer ID. Typically, your proprietary tools will provide you with the corresponding Customer ID you’ll use with CSA.
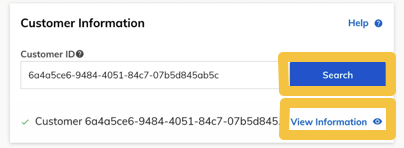
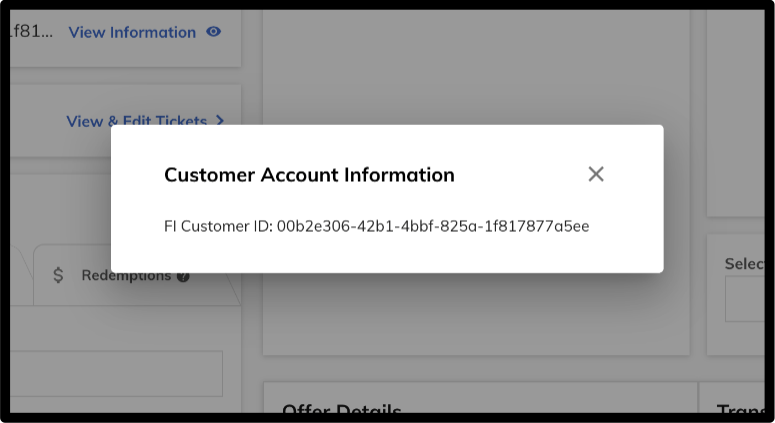
Clicking View Information shows a popup box with the Customer ID:
Finding Offers
To look for the offer that the customer is contacting you about, you’ll click on the Offers tab in the “Offer & Transaction Search” section on the left side of the screen:
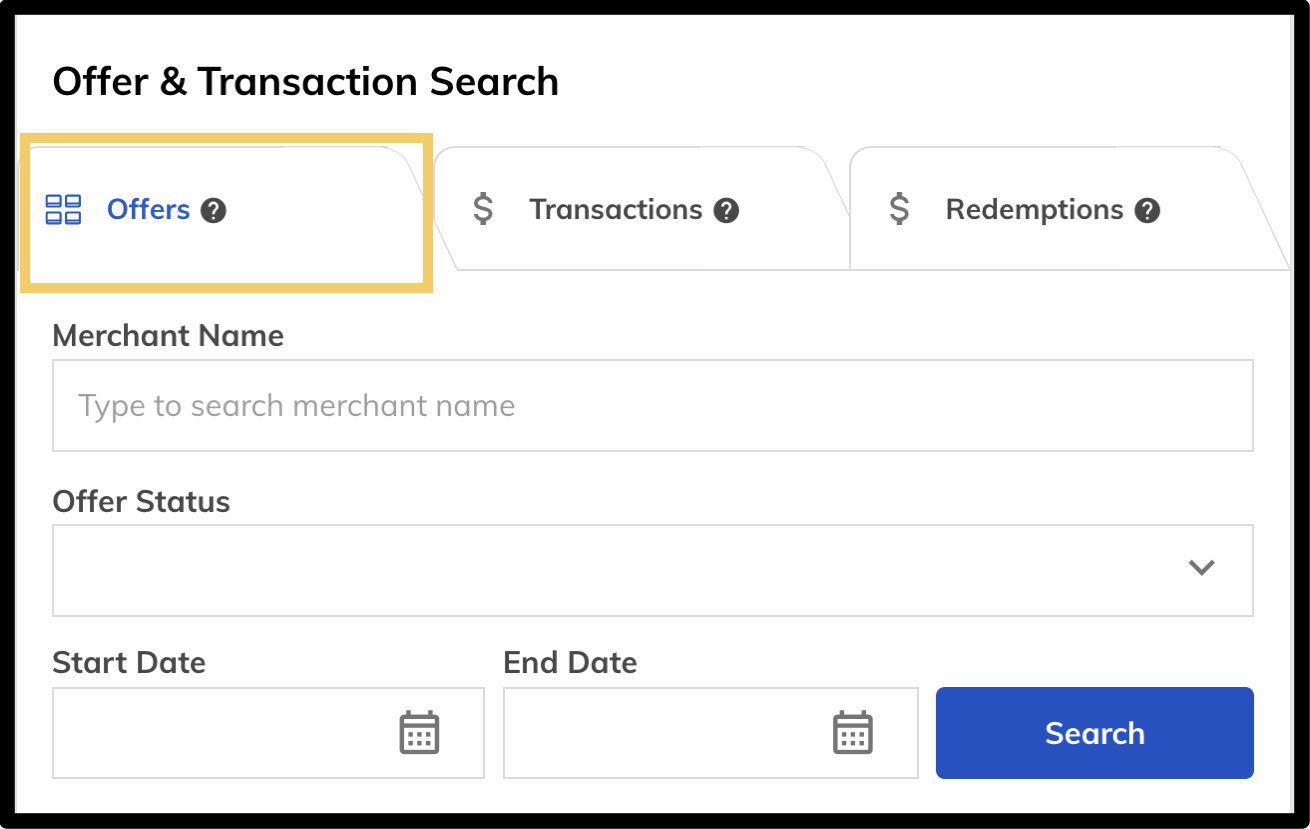
You can search by Merchant Name, by Status, or by Start / End Date range. Relevant offers will populate within the table below the search.
Note: The date range defaults to a 90 day period from today’s date. To find offers earlier than the 90 day default window in CSA:
- Click the X next to the end date calendar.
- Click the start date to bring up the calendar.
- Use the arrows to move to the desired start date.
- Click the end date to bring up the calendar if needed to adjust the end date for your search.
- Click Search.
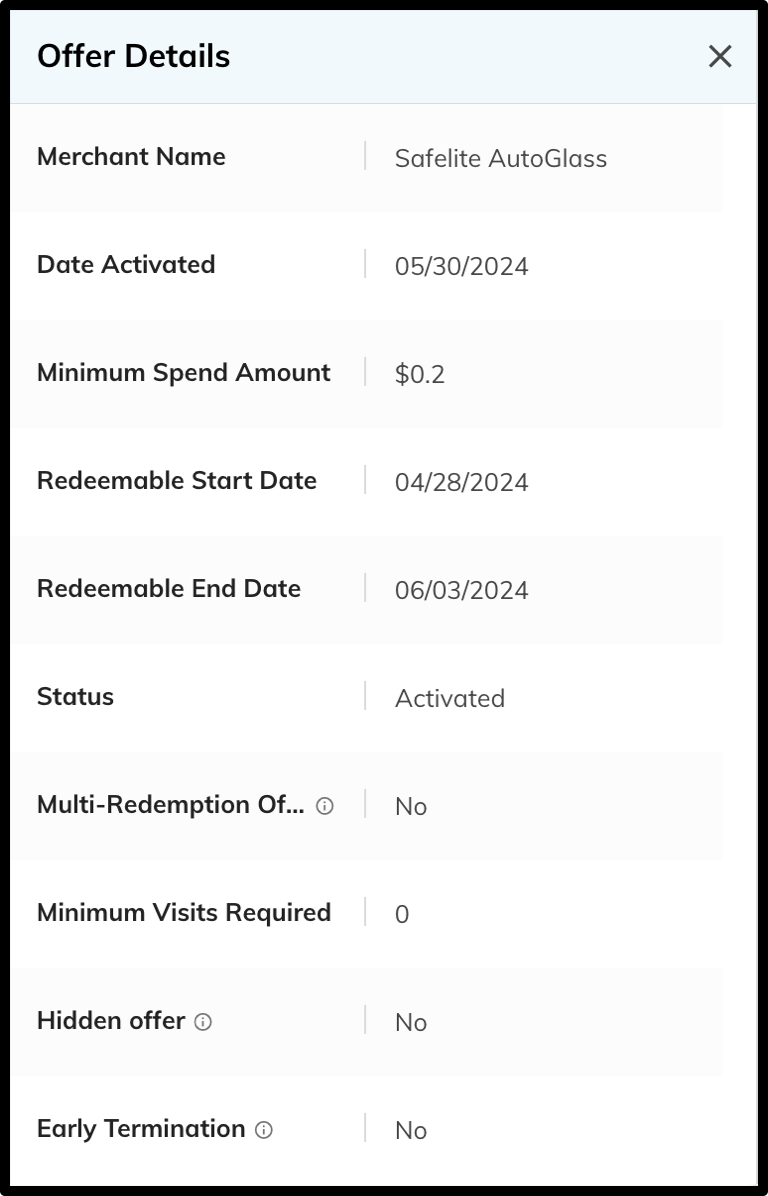
Be aware - there may be multiple offers for a merchant in consecutive date ranges - be sure you’re selecting the correct offer for the user’s transaction. Once an offer is selected, specific information for that offer is populated in the right-hand Offer Details panel.
Offer Details
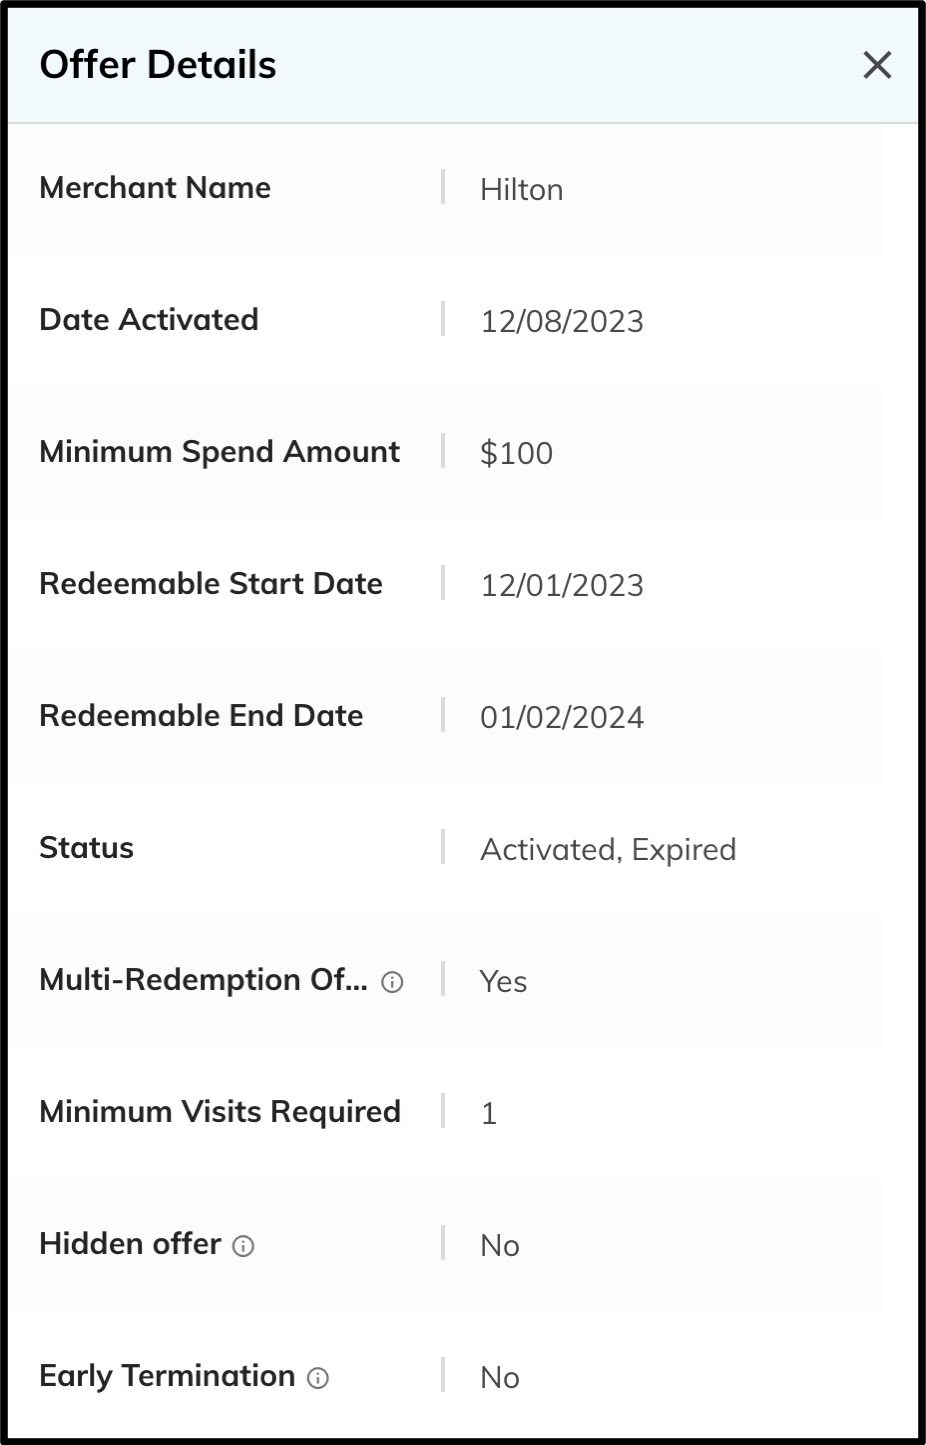
The “Offer Details” section shows you information about the offer as it relates to the customer. You can see if and when the customer activated the offer, as well as the offer start / end dates, minimum spend amount and other information that can be helpful.
As this is shown alongside the “Transaction Details” section, you can easily see if the activation date was before the transaction date, if the minimum spend was met, and assess other parameters of the offer and transaction:
Advertiser Copy
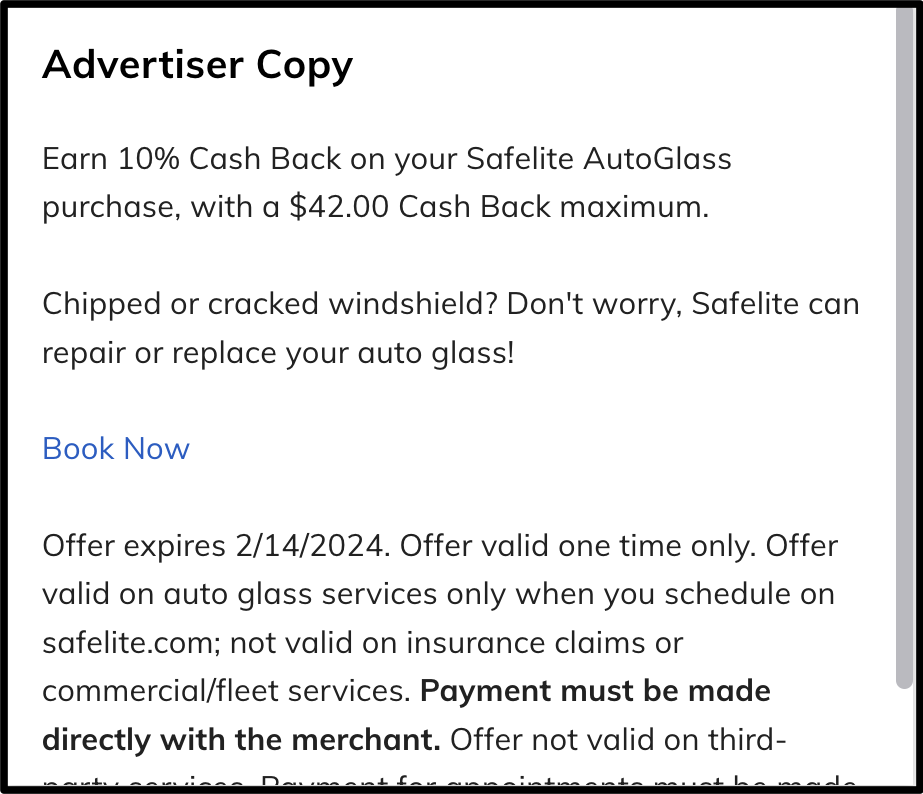
The “Advertiser Copy” section displays the text of the offer as shown to the customer. This can be very helpful for determining why the customer did not receive an expected redemption.
Things to look for:
- Minimum spend requirements
- Minimum visit / purchase requirements
- Max cash back limits
- Location limitations
- Only valid at certain locations
- Only valid online / in-store
- Only valid with certain brands
- Other exclusions or restrictions noted in the offer
Finding Transactions
To find the relevant transactions for a customer click on the “Transactions” tab in the “Offer & Transactions Search” section on the left side of the screen:
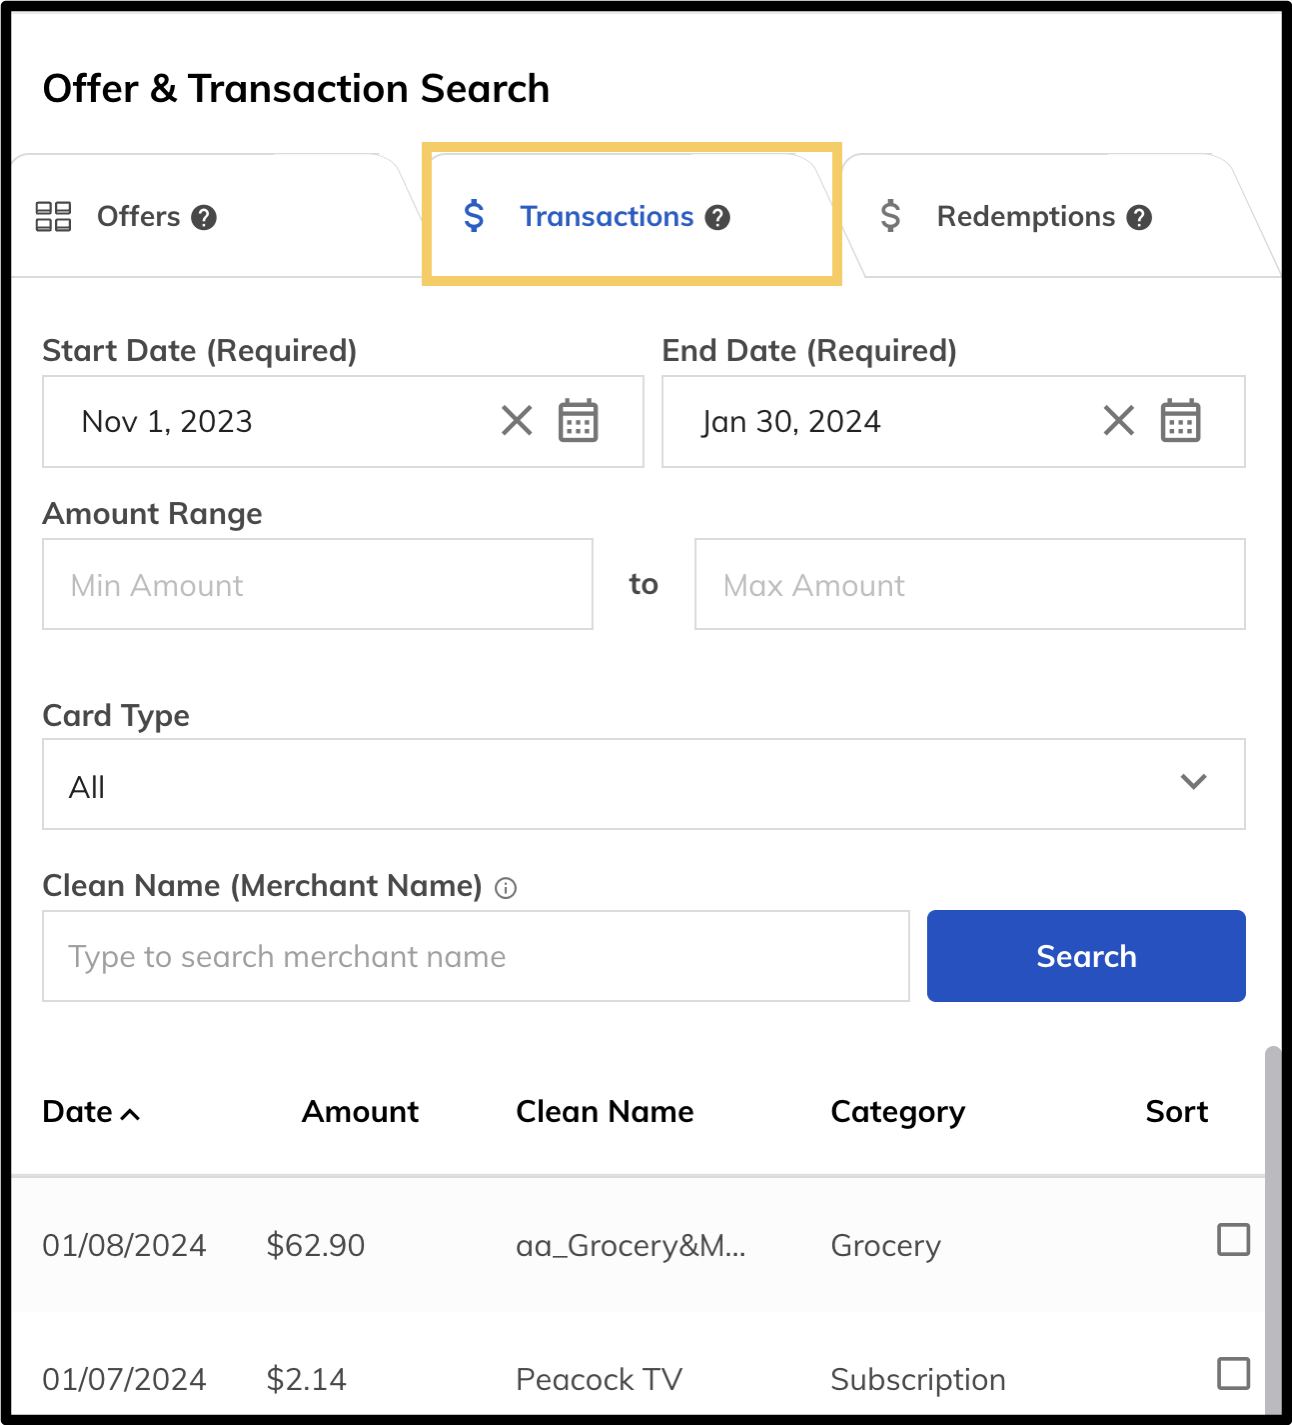
You can search by Start / End Date range (required), and optionally Amount Range or Clean Name (Merchant Name). Clicking Search pulls up relevant transactions. Tip: If you aren’t seeing the transaction you’re searching for, consider leaving the Amount Range and Clean / Merchant Name blank so that you see all the transactions in the time frame.
Note: The date range defaults to a 90 day period. To find transactions earlier than the 90 day default window in CSA:
- Click the X next to the end date calendar.
- Click the start date to bring up the calendar.
- Use the arrows to move to the desired start date.
- Click on the end date to bring up the calendar and use the arrows to move to the latest available date (dates will be grayed out if they're outside the 90 day range).
- Click Search.
Once a transaction is selected, the transaction details populate in the right- hand panel, alongside the offer detail that was previously selected. You can select up to 10 transactions to view alongside the corresponding offer. If you are escalating a split transaction, be sure to select all of the relevant transactions.
Transaction Details
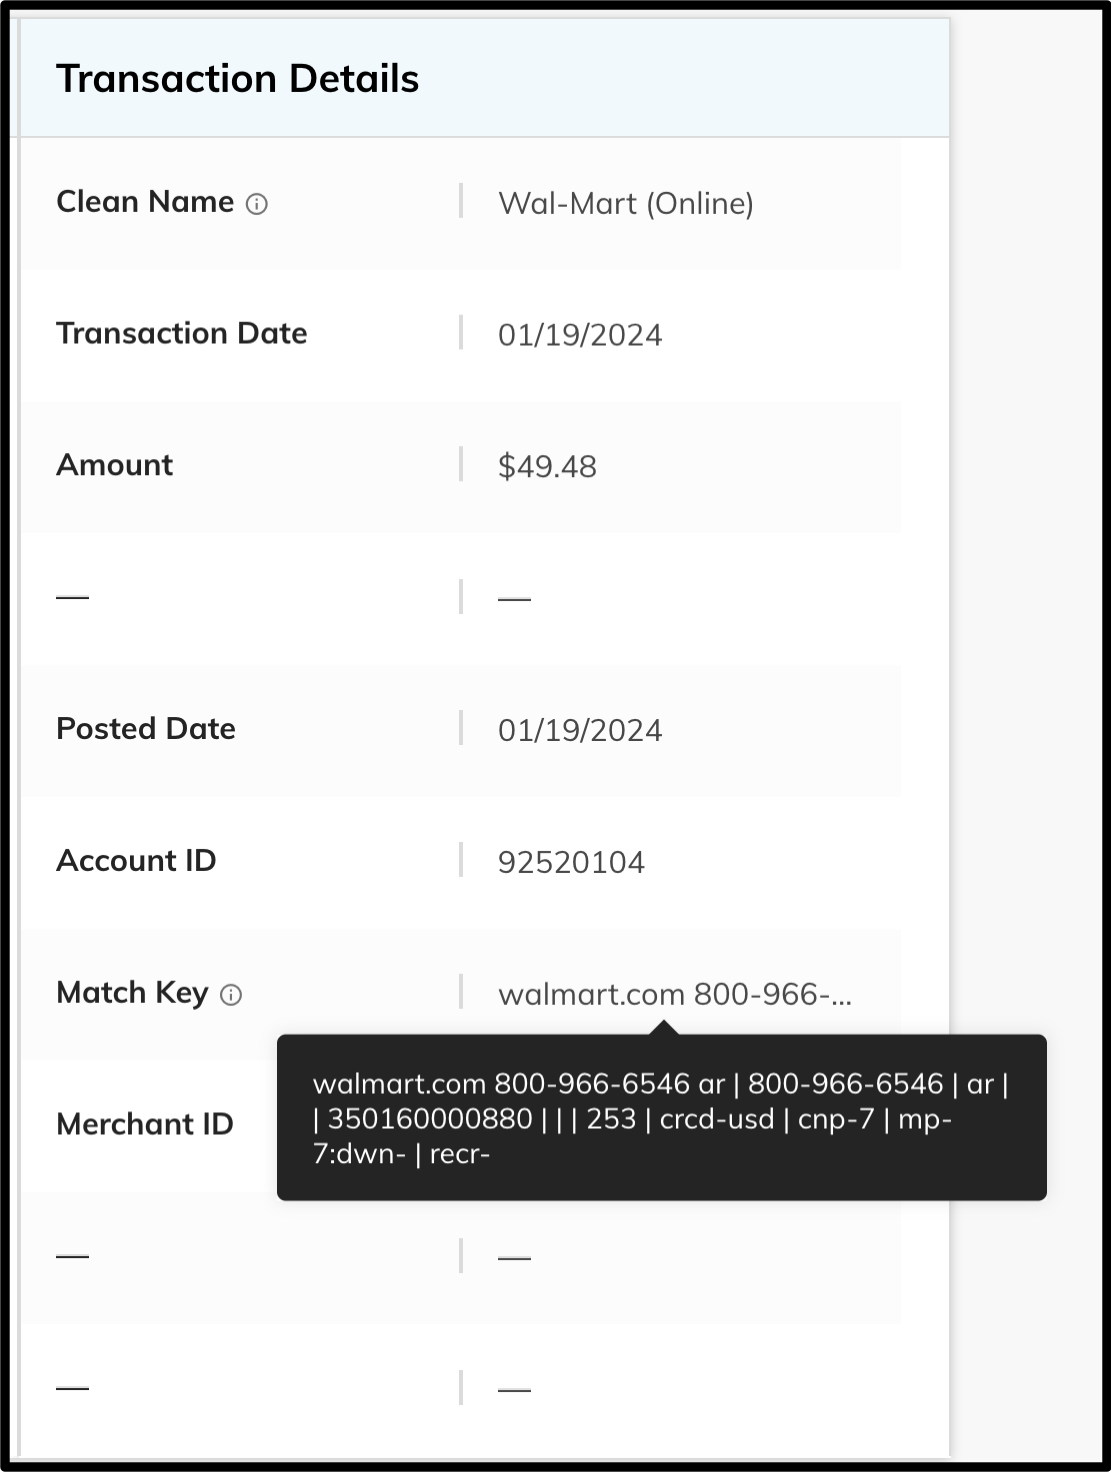
This section provides information about the specific transaction that has been selected.
- Clean Name - The clean name is the label Cardlytics has applied to the merchant. It may not be identical to the merchant name, but it should be similar.
- Note: If you see something that starts with ‘aa_’ (e.g. - aa_Restaurants) or ’Unassigned’, there may be a merchant cleaning issue.
- Transaction Date - This is the date the transaction took place
- Amount - This is the amount of the transaction
- Posted Date - This is the date the transaction was posted
- Account ID - This is the account that the customer transacted on
- Match Key - The match key is the raw transaction data that Cardlytics receives when a customer transaction is processed. You can hover over the match key to see the complete data.
- For example: holiday inn express melb | 5084271667 | fl | 32904 | 736201634887 | | | 1001 | crcd-840 | cnp-1 | mp-:dwn- | recr-
- Merchant ID - this is the Merchant ID that we cleaned the transaction to
Issue Tiles and Issue Details
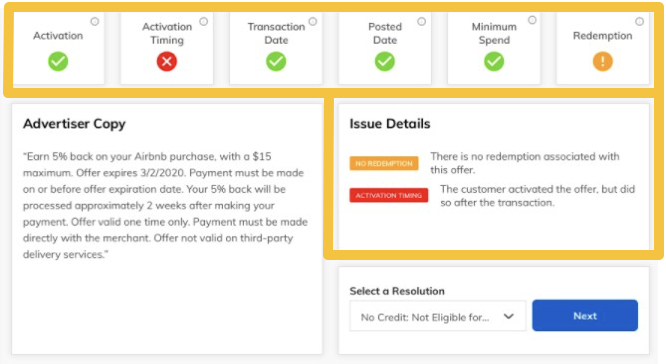
Once an offer and transaction are selected, the tiles at the top of the tool will automatically populate in real time. These tiles identify potential issues with the customer’s current inquiry and can provide you with an immediate answer to the customer’s inquiry:

- Activation: Shows green when the customer has previously activated the offer and shows red when the customer has not yet activated the offer
- Activation Timing: Shows green when the customer activated the offer before the transaction and shows red if the customer activated the offer after the transaction
- Transaction Date: Shows green if the transaction was authorized within the offer’s eligible date window and shows red if the transaction was authorized outside of the offer’s eligible date window
- Posted Date: Shows green if the transaction posted within the offer’s eligible date window and shows red if the transaction posted outside of the offer’s eligible date window
- Minimum Spend: Shows green if the transaction amount met the offer’s minimum spend requirement and shows red if the transaction amount did not meet the offer’s minimum spend requirement
- Redemption: Shows green if there is a redemption associated with the offer and shows orange if there is no redemption yet associated with the offer.
The “Issue Details” section underneath explains a bit more about the tiles which are showing red or orange results:
Redemptions
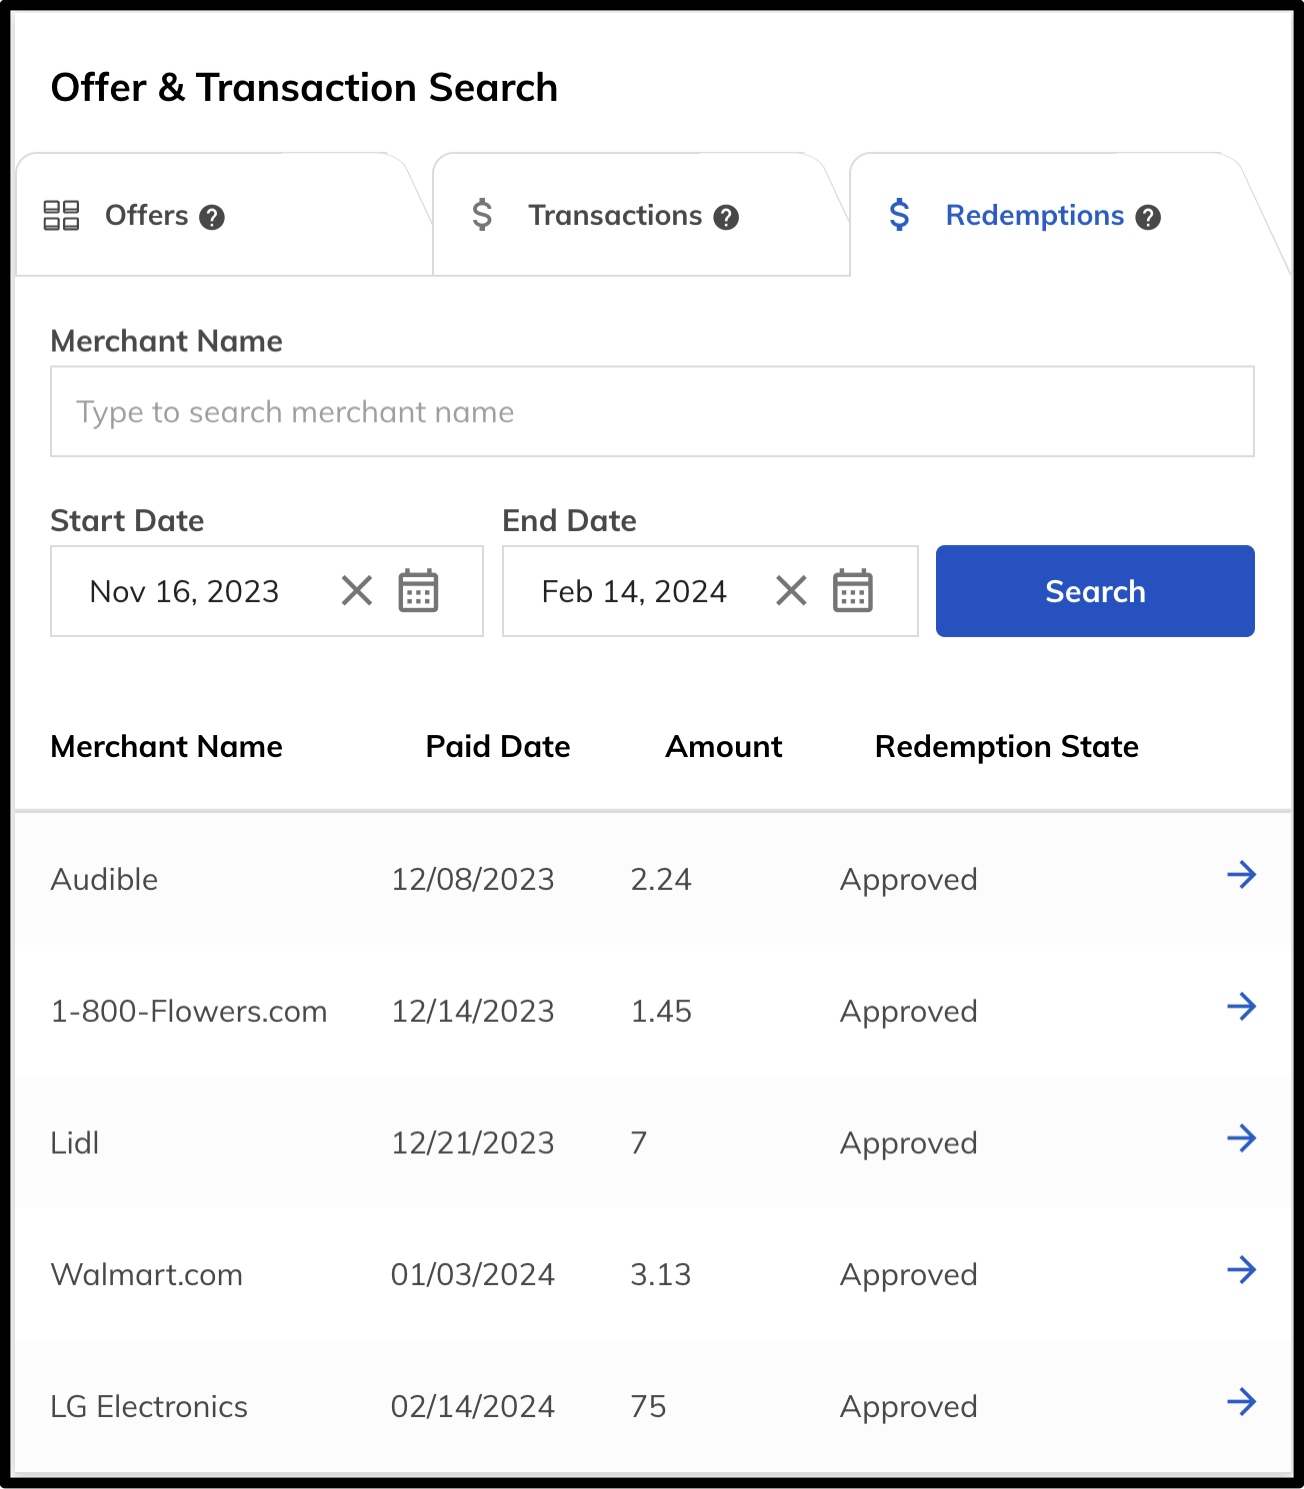
You can review all of the redemptions for a customer. The default is to show the last 90 days. As with other searches, you can find transactions earlier than the 90 day default window by using the calendar / date parameters in the search. You can also search by the merchant’s name.
To see the offer and transaction that resulted in the redemption, click on the “Redemption” tab and the corresponding offer and transaction will populate on the right.
Redemption Statuses / Meaning
Redemptions can be in one of three statuses:
- Approved - this means that the redemption was approved and funded
- Pending - this means that the redemption is pending approval
- Denied - this means that the redemption has not been approved
Note: On some types of campaigns, such as cumulative or tiered campaigns, a transaction may be initially denied until the end of the campaign, at which point a customer’s transactions with that merchant will be analyzed to determine the appropriate redemption. ![ref6]
- Example: The offer states something like “Earn 5% on all purchases when you spend up to $150 or 15% on all purchases when you spend over $150”. At the end of the campaign, the customer’s transactions are evaluated, and if their spend is $150 or more, then the higher percentage is applied.
Redemption Details
If one or more redemption was issued for an offer, these will appear below the “Offer Details” and “Transaction Details” section in the “Redemption Details” section. If there are more than one, you’ll see an indication in the upper right of that section, and there will be arrows to scroll through them in the upper right of the Redemption Details section:
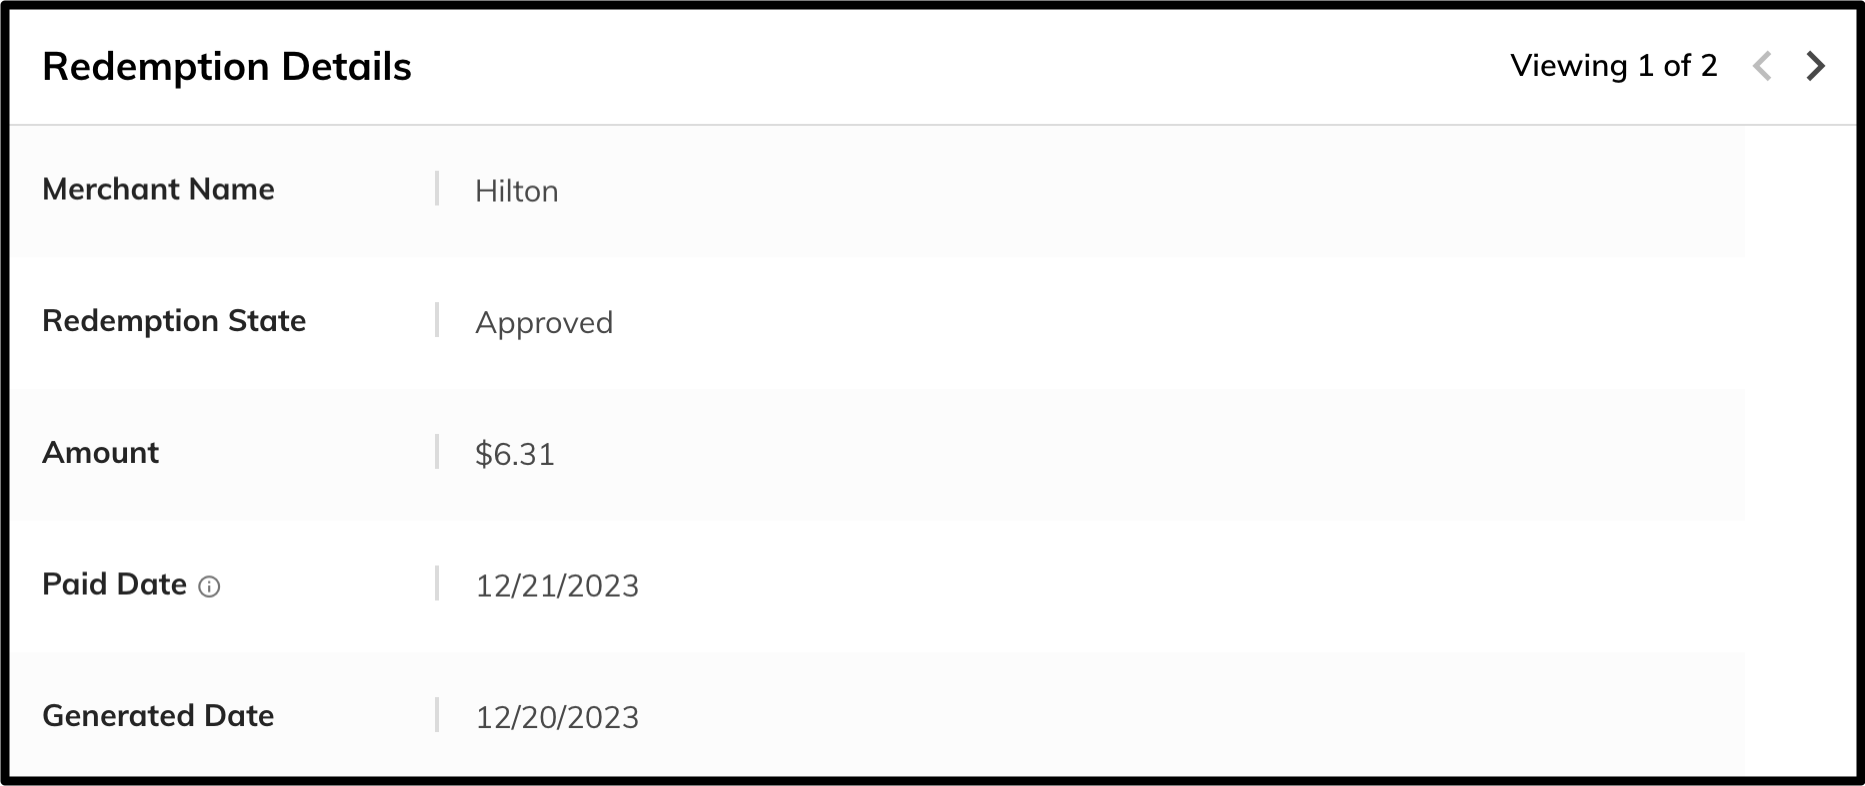
Note: Redemption details displayed are related to the offer and not necessarily the specific transaction that you’ve selected.
Resolutions
When you are working on a customer inquiry, whether or not you are able to resolve the issue, you should still create a ticket. This allows for comprehensive reporting and ability to iterate the application. ![ref8]
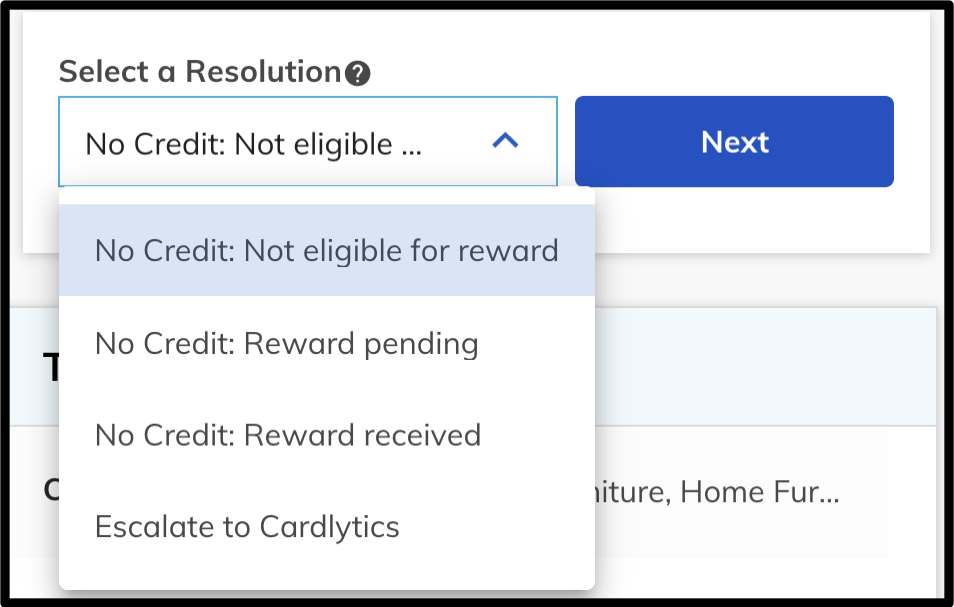
Ensure that you take special note of the different types of resolutions you can select, and what happens with the ticket for each one, so that your ticket is dispositioned the way you want!
Resolution Types
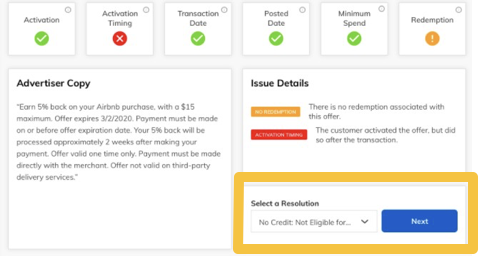
These are provided within the drop-down menu beneath the tiles to select how to solve the customer’s inquiry.
Resolution | Meaning | Example |
|---|---|---|
No Credit: Not eligible for reward | With this option selected, upon submitting a ticket immediately sets ticket status to ‘Closed’ Ticket can no longer be edited | Customer did not activate the offer prior to the transaction. |
No Credit: Reward pending | With this option selected, upon submitting a ticket immediately sets ticket status to ‘Open’ Ticket can still be edited | You see in the “Redemptions” tab that a redemption is pending for the customer. |
No Credit: Reward received | With this option selected, upon submitting a ticket immediately sets ticket status to ‘Closed’ Ticket can no longer be edited | You see in the “Redemptions” tab that a redemption has been approved for the customer. |
Escalate to Cardlytics Note: This is the ONLY option which sends tickets to Cardlytics for review! | With this option selected, upon submitting a ticket immediately sets ticket status to ‘In Process Ticket can no longer be edited Escalates to Cardlytics for review; when Cardlytics responds, the ticket status is set to ‘Closed’ | You escalate a ticket for a transaction that appears to have a merchant cleaning issue. Upon escalation, the ticket is ‘In Process and being reviewed by Cardlytics. Cardlytics responds that there is a merchant cleaning issue, and that a forced redemption has been submitted. The ticket is then set to ‘Closed’. |
Blank | If no resolution is selected, the ticket remains ‘Open’ Ticket can still be edited | This scenario may be used if you have internal processes to review these tickets and determine next steps. It is recommended to review ‘Open’ tickets with no resolution regularly to avoid any instances where a legitimate customer issue goes unresolved. |
Once you choose a resolution, click ‘Next’ and you will move on to a “Review & Submit Ticket” pop up where information from the previous page is populated.
Add Issue Detail Options
These options exist in a drop-down menu in the “Review & Submit Ticket” screen. These options are available if the tool itself cannot automatically detect the issue that the customer is experiencing.
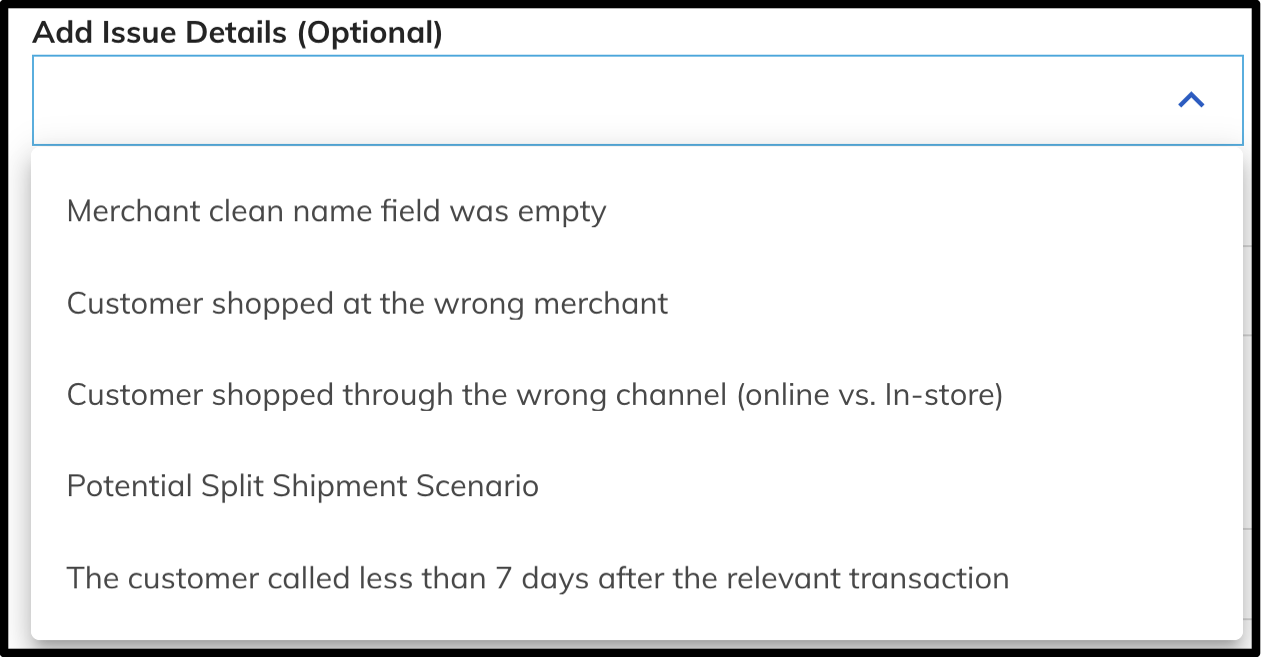
This is optional to select and should only be selected if relevant. This information does not come through to Cardlytics if you escalate a ticket.
- Merchant clean name field was empty - Cardlytics was unable to effectively clean the merchant transaction string.
- Customer shopped at the wrong merchant - The customer shopped at a merchant not specific to the offer.
- Customer shopped through the wrong purchase channel - Based on the offer details, the customer shopped in the incorrect channel (instore, online).
- Potential Split Shipment Scenario - The customer's original transaction was split into multiple transactions/shipments by the merchant.
- Customer called less than 7 days after the relevant transaction - depending on your bank, rewards may not be generated to the customer yet.
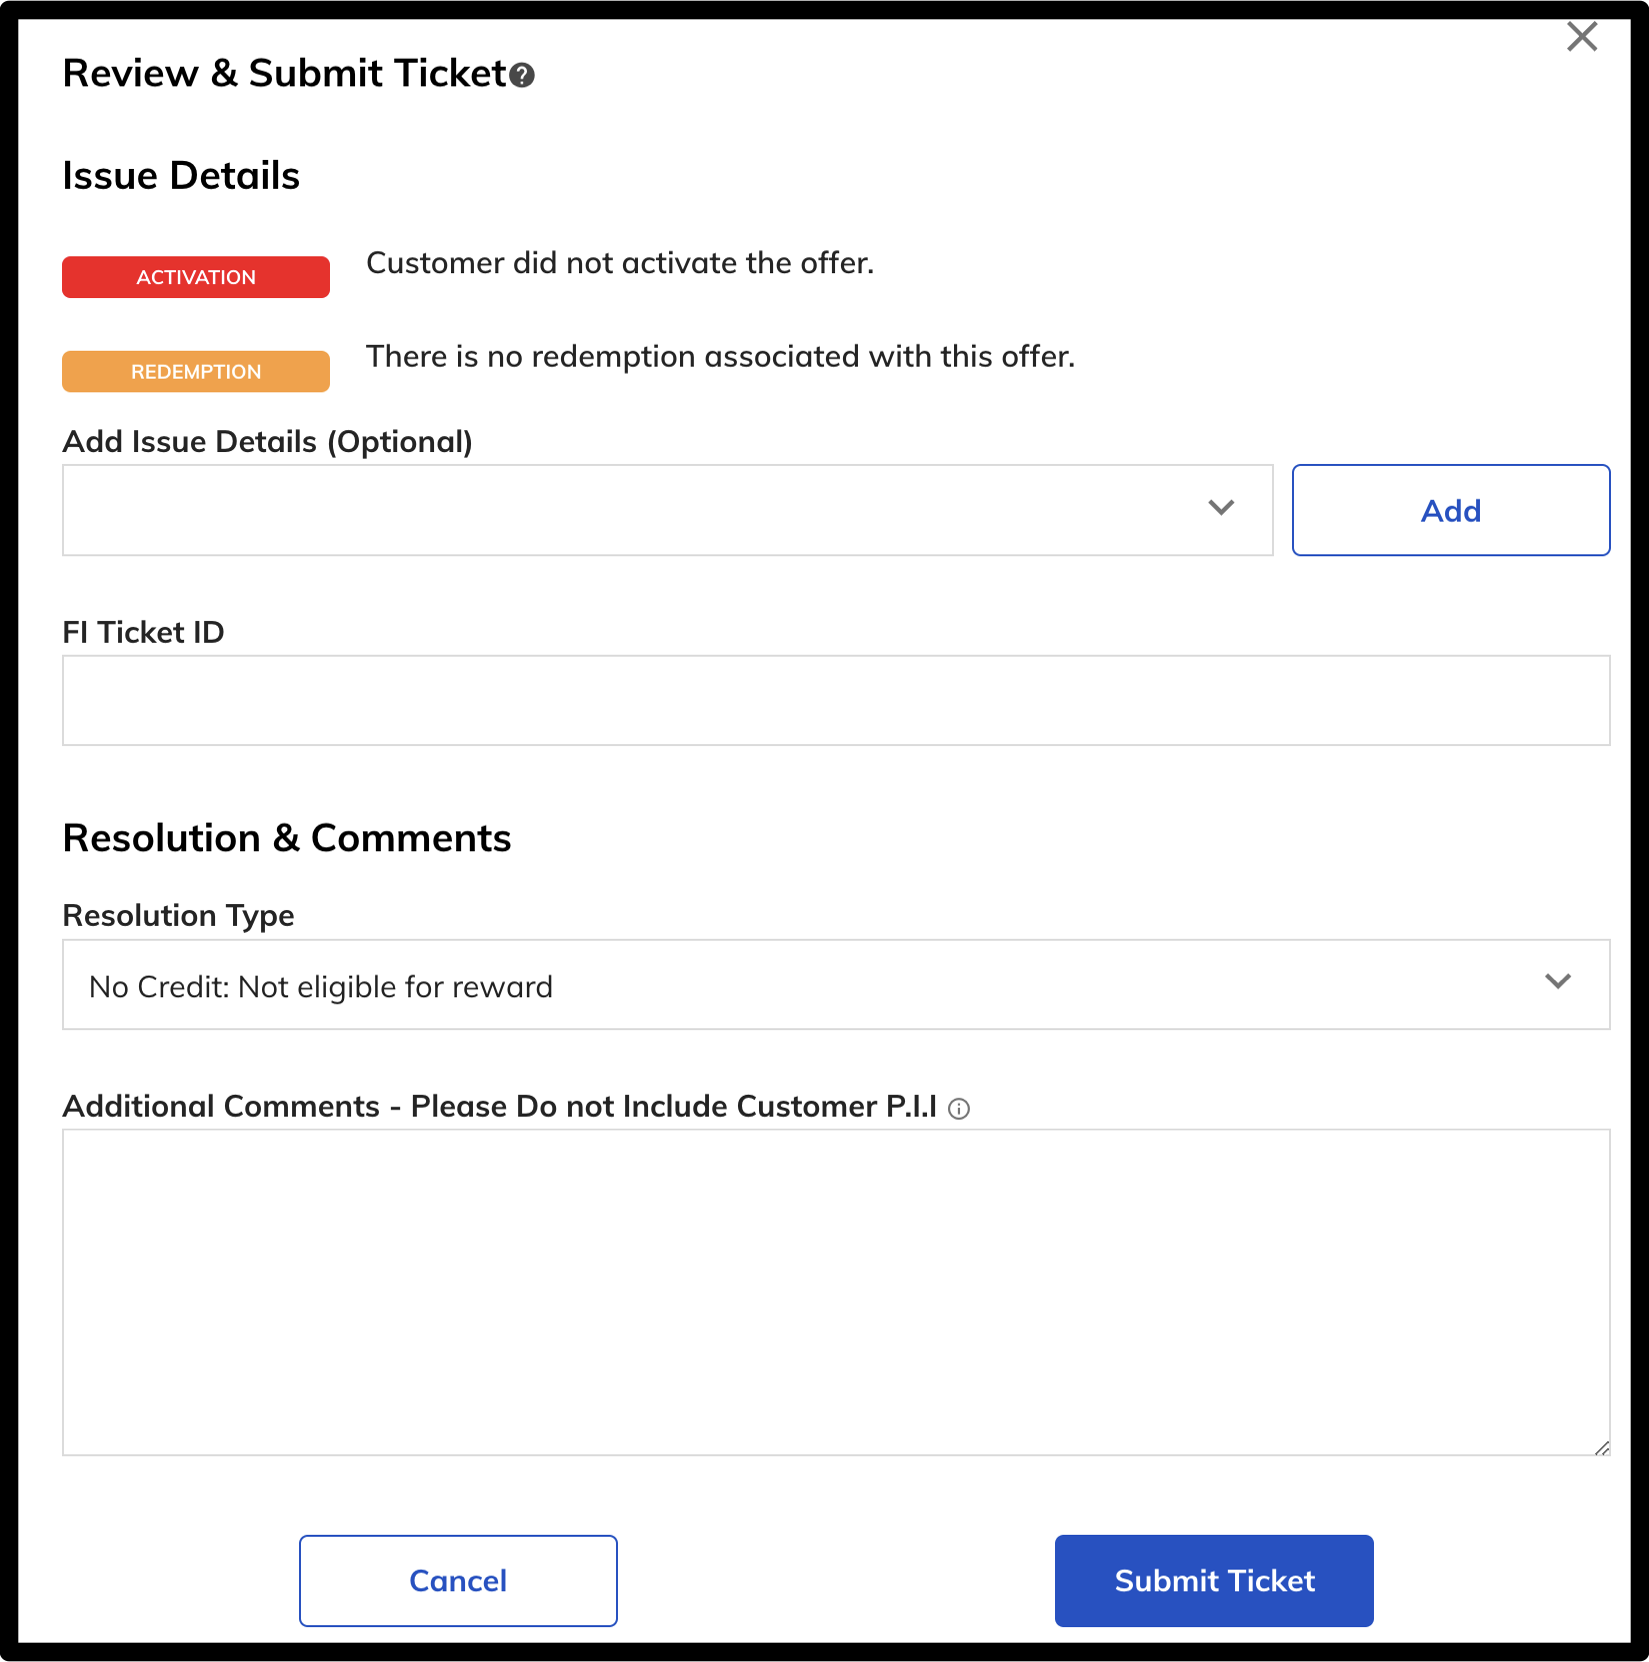
You can optionally add an FI ticket ID to allow you to help track this ticket. A Cardlytics ticket ID will be automatically assigned to the ticket.
If you want to change the “Resolution Type” you previously selected, you can do so within the “Review & Submit Ticket” window.
You can enter additional comments, providing information that may be helpful in explaining the resolution; or, if you escalate your ticket to Cardlyics, this information will help Cardlytics to understand the situation better.
Some examples of things to consider including in tickets escalated to Cardlytics:
- If you see that the clean name is not correct, provide any information you may have about the merchant - especially hotels. Hotel names and/or addresses, if available, can be very helpful in resolving escalated tickets more quickly.
- With online orders, if there is a delay in shipping, you may see that the transaction date reflects the ship date rather than the date the transaction was authorized. Providing the authorization date will allow Cardlytics to more quickly resolve your ticket.
- If the transaction selected is not the transaction in question (because you were unable to locate the correct transaction in CSA), include the phrase “Dummy Transaction” and provide the transaction date and amount in the “Additional Comments” section.
Some things that you don’t need to include in your ticket:
-
Copy from the Advertiser Copy or Offer Details (unless there is some specific issue / concern with the ad copy or Offer Detail information).
-
Never include any P.I.I. (Personally Identifiable Information)! This includes (but is not limited to) names, account numbers, and customer addresses.
Ensure that you validate that all information is correct, and click “Submit Ticket.” The ticket is escalated back to Cardlytics or is closed, depending on the resolution type.
Cardlytics is able to set up an email communication sent to a single email (it can be a distribution list) around issues that are escalated to Cardlytics. With this, we would send a message to the specified email address whenever an escalated ticket is closed. This can be customized to some degree (for example, only sending emails if a ticket is closed as ‘Invalid’ or ‘Not Enough Information’, etc.). Always reach out to us for more information if necessary.
Looking up Tickets
To view the “Customer Service Ticket” section, select “View & Edit Tickets”. This will expand the section so that you can see the submitted tickets.
Note: The Start and End dates will pre-populate with a 90 day range. You will need to enter a Start and End date range in order for tickets to be shown - this is the case for either the My Tickets or Customer Tickets tabs.
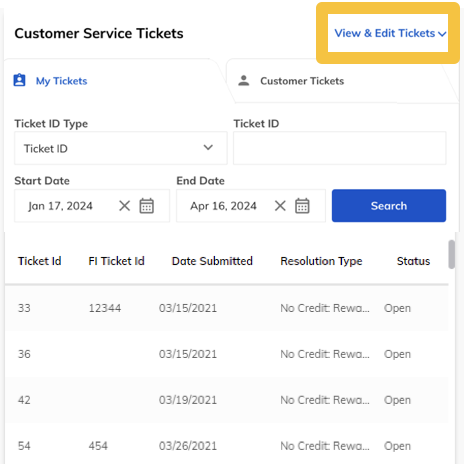
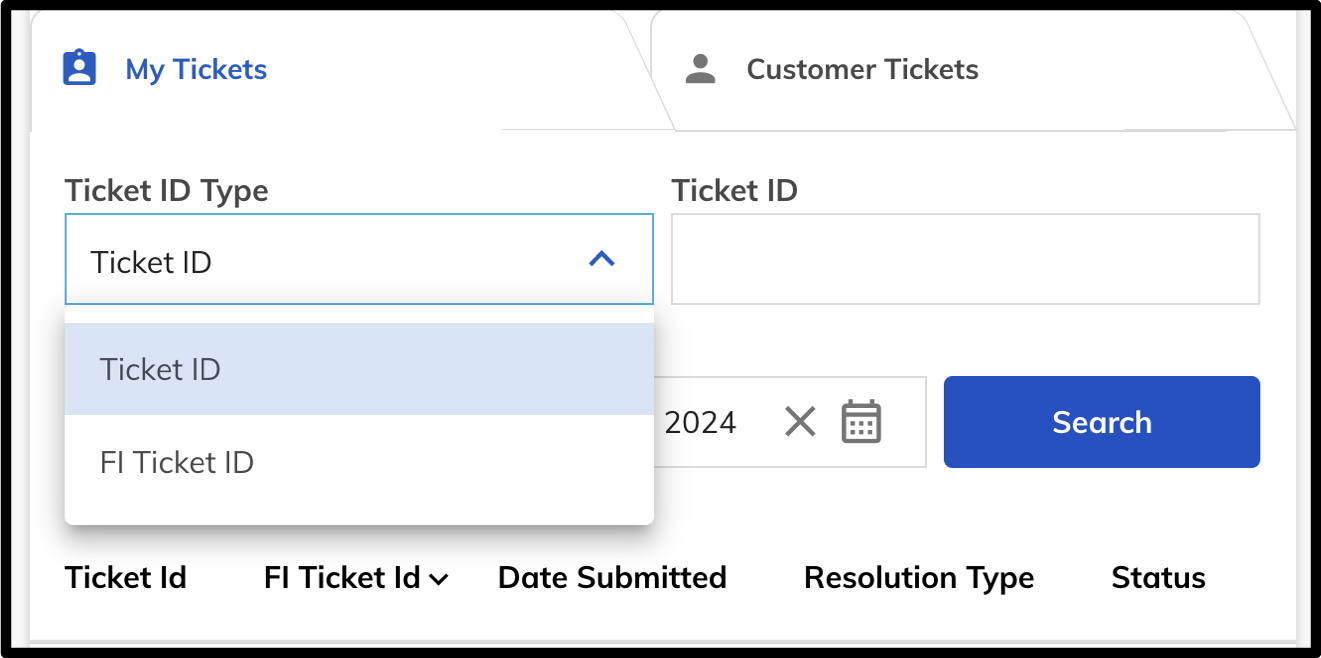
My Tickets: Shows all tickets associated with your financial institution.
Customer Tickets: Shows all tickets specific to that customer.
You can search for a specific ticket by Ticket ID (either the Cardlytics Ticket ID or the FI Ticket ID). Select the type of Ticket ID and input the Ticket ID into the Ticket ID field and select “Search” to populate the table. Or, you can leave these fields blank to see all the tickets; tickets are sorted by default from most recent to oldest.
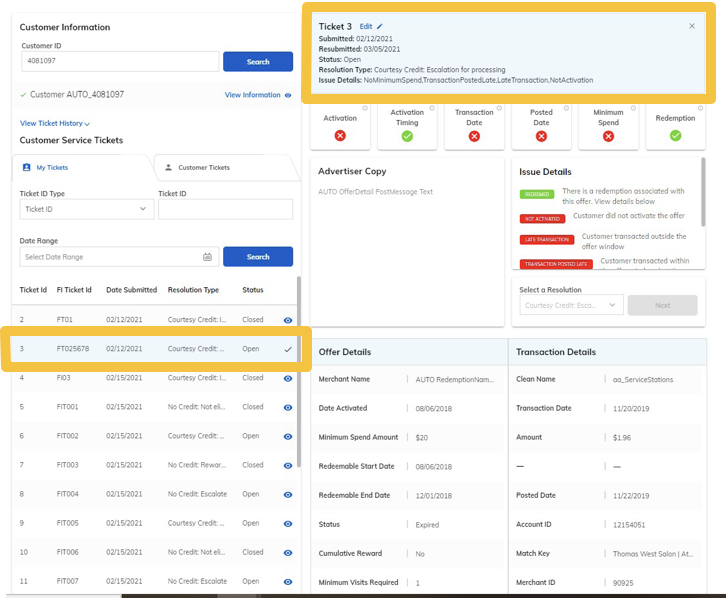
Click on a Ticket to see the ticket details which display in the right-hand panel of the tool.
The top of the panel will show pertinent ticket details. Below, the specific “Offer Details”, “Transaction Details” and “Redemption Details” sections related to that ticket will populate.
Updating Tickets
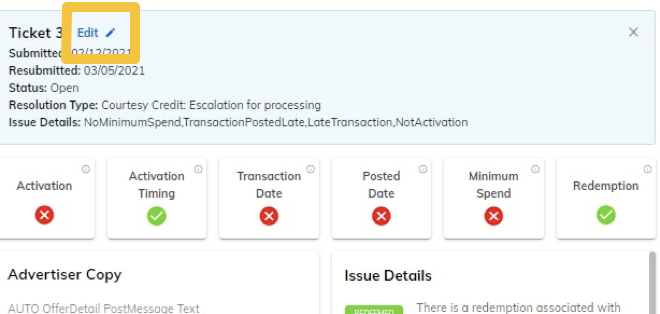
If the ticket status is “Open” and you would like to make a change, you can click “edit”, make any needed changes, and resubmit (if applicable).
Troubleshooting Tickets
-
Q: What do I do if all of the issue details tiles come back green, but there is still no redemption?
-
A: Review the “Advertiser Copy” and “Transaction Details” sections:
- Is the merchant (or clean) name present?
- Was there a specific channel eligible for the offer (in store / online)?
- Were there any other exclusions that may have disqualified the transaction?
- If all else fails, escalate the ticket to Cardlytics, and we’ll be happy to research it and respond with our findings.
-
Q: How soon will the client receive the reward after making the transaction?
-
A: The customer should generally wait 7-14 days for the transaction to fully post because rewards are not in real time. Make sure to review the “Advertiser Copy” section to see if there are any specific delays in redemptions, especially for travel related and cumulative / tiered campaigns.
-
Q: I can’t find the transaction that I’m looking for!
-
A: Check the following:
- Is the date range of transactions encompassing the date of the transaction?
- Did you try searching through transactions with the “Merchant Name” field blank in case there was a cleaning issue?
- When all else fails, select any transaction as a dummy transaction, and escalate to Cardlytics. Make sure you indicate in the comments that a dummy transaction was selected, and provide the actual transaction date and amount.
Updated 6 months ago